We’re Cooking Again – An Old Time Recipe From My Grandma

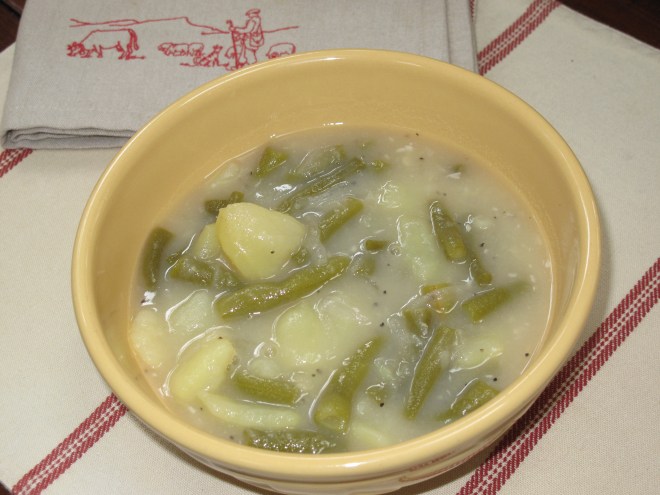
We’ve had a bumper crop of green beans here on Glen Road and I have been thinking about a green bean soup recipe that my Grandma used to make from as far back as I can remember.  The problem was that I didn’t have the recipe and I would never be able to make the soup from memory.  So I had my mom and aunt confer and get back to me on how to make this old-time soup just like my Grandma used to make it.  There are a number of foods that I remember from when I was young and this soup was one of them.  I know to many that the idea of a green bean soup will not sound too appetizing.  However, when you add thinly sliced onions, cubed potatoes and a garlic-laced roux, you end up with a slightly thick green bean stew with lots of flavor.  My recipe is for a double batch.  Some to eat now and some to freeze for later this Fall when soups just seem to taste better.  So if you have a late season green bean harvest and don’t know what to do with them, why not give my Grandma’s green bean soup a try.  It starts with some fresh green beans:

Ingredients:

  • 4 to 5 cups of fresh green beans (cleaned and snapped into 1″ pieces)
  • 4 to 5 large potatoes (cleaned, peeled and cut into cubes.  I used Yukon Gold potatoes.)
  • 1 medium yellow onion (thinly sliced.  A mandolin works perfect.  We are onion lovers so feel free to use less onion if you wish.)
  • 6 tablespoons of flour
  • 6 tablespoons of melted butter (let the butter cool slightly before using)
  • 6 to 7 cloves of garlic
  • Salt and fresh pepper to taste

Directions:

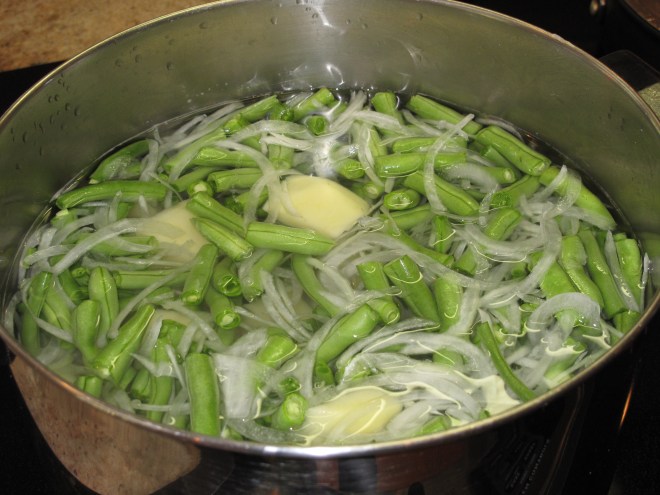
Place green beans, potatoes and onion into a stock pot and cover with water.  Add enough water to cover all the vegetables.  Place on medium heat and boil until the vegetables are tender.

While the vegetables are boiling, start to make the roux.  Just the word “roux” makes most people think of some fancy cooking routine that takes a lot of time and patience.  Don’t let the word fool you.  A roux is nothing but a cooked mixture of flour and a cooking fat, like butter or vegetable oil, that is used to thicken sauces, soups and gravies.  A couple of things on the roux for this soup:  first, you want to cook the roux until it turns a deep golden brown.  Second, keep the garlic in the pan until it starts to brown and then remove it.  If you leave the garlic in too long and it burns, it will ruin the flavor of your roux.  Last, mix the flour and cooled, melted butter in the pan until well combined and then add the whole garlic cloves before turning the stove heat on.  Here are a few pictures showing how the roux will progress.

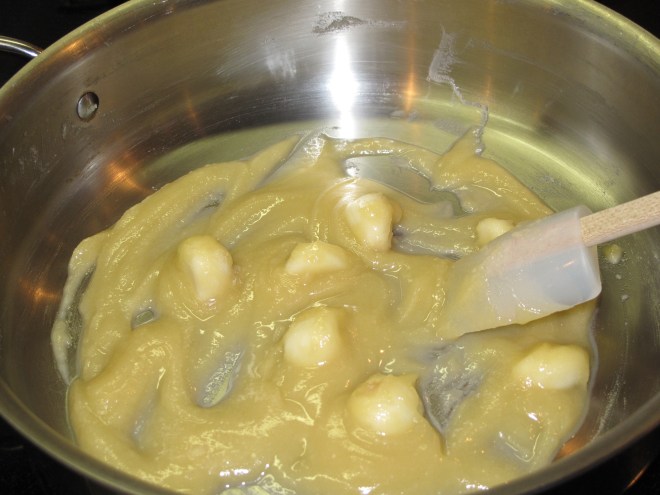
The beginning–the flour and cooled, melted butter combined and then the garlic cloves added before turning up the heat:

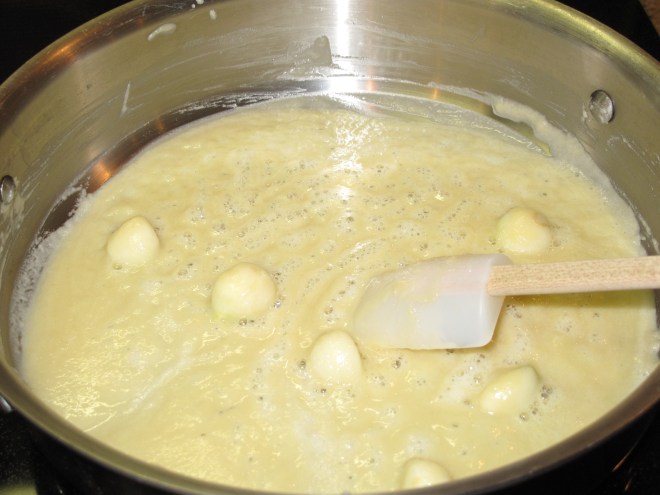
The middle–the roux is now more sauce-like and lightly simmering:

The end–when the roux is a deep golden brown, take it off the heat and let it cool a bit before you add it to the vegetable mixture.  Note that the garlic cloves are gone.  Again, make sure to remove them when they begin to brown.  If they burn, your roux will not be good and you will need to start over.

Once your vegetables are tender, add the roux into the vegetable pot and stir the roux until it combines with the water.  Once combined, add plenty of salt and pepper.  Taste buds vary, so add until you are satisfied.  I tend to add more, versus less, salt and pepper.  For me, it’s around 1 tablespoon of salt and about three teaspoons of pepper.  Remove the pot from the heat and let the soup sit for a few hours.  This is one of those dishes that is better the longer you wait to eat it.  Letting the soup sit for several hours or overnight in the refrigerator allows the flavors to combine.  When ready to eat, place the pot back on the burner and simmer until hot.  Ensure that the salt and pepper levels are adequate.  Serve it any way you like.  In our house, we eat just the soup with some fresh bread or rolls.  Any way you serve it, this hot and hearty soup is one that pleases.  At least it has in my family for almost a century.  Enjoy!!

Restaurant Field Trip – The Whelk

Last year at about this time, we visited Le Farm restaurant in Westport, CT.  The restaurant’s owner and head chef, Bill Taibe, is one of the leaders in the area for the farm to table movement, where fresh food is bought from local farmers, brought into his restaurant and served to his customers.  In January of this year, Bill Taibe opened up his latest restaurant, The Whelk, along the water in Westport.  This new restaurant is heavily concentrated on seafood.  Just like Le Farm, The Whelk shares the same artisanal philosophy, using as many fresh and locally grown ingredients as possible.  The Whelk is also focused on fresh and sustainable seafood.

Question:  So, you are asking, what is a whelk?  The answer is below.

While the Whelk is just above the Saugatuck River, the windows in the rectangular dining area face the street, not the water.  Yet the interior has the feel of an informal seafood shack with large harbor lights hung above the bar and slatted picnic chairs and benches, the kind you might find outdoors at a roadside spot.  During our visit, there were eight main course offerings, but it is the smaller plates and appetizers that were the draw for us.  The food that we ate was so good, we are planning to return for a second round next week.  Come see what we ate at our first visit to The Whelk:

We started off with appetizers and small plates.  As in a typical seafood shack, our first courses were served on plates covered in newspaper.  Here is one BBQ little neck clam left from a plate of eight.  These were fresh clams with a little bit of BBQ sauce and bacon placed on top before being placed under the broiler for a few minutes.  These clams went fast.

Another favorite was the hot smoked trout dip served with trout roe and crackers and bread.

We have a friend who says she has never met a potato that she doesn’t like.  Here are some french fries with ketchup and a delicious smoked mayo.

A good wine that was recommended to us by our server.  The Whelk has a large list of by-the-glass and by-the-bottle wines.  This French selection was a little more acidic than I would normally like, but that worked well with the seafood that we ate during our visit.

One of my favorites!  Gulf shrimp and grits with pickled jalapeno-ramp butter and country ham.  Reminds me of our trip to Charleston, SC.

One of the more unique offerings the night we were there.  This is squid ink cavatelli with red shrimp, mexican chorizo and preserved tomatoes.

Cornmeal fried catfish with early summer slaw and walnut-pepper romesco (partly devoured at time of photo).

Rare seared line caught tuna with bacon and black olive and green pea dressing.  An offering that was limited, but we were lucky enough to “snag” one.  Get the seafood joke here?!?

My vote for “Best Of Show”.  Norman’s (we don’t know who Norman is, but he is a man with good taste) lobster butter with leeks, peas and fingerling potatoes.  We were told this is a lobster that is slowly poached and then removed from its shell.  The poaching liquid is then reduced and the lobster meat is added back along with the potatoes, peas and leeks.

What’s dinner without some dessert?  The Whelk offered a small and homey dessert menu for us to choose from.

A quickly devoured set of Whoopie Pies.  These pies never disappoint.

Two at a time…a magic bar in the background with butterscotch and sea salt.  In the front is a meyer lemon posset with cornmeal cookies.  Yummy!

As in our visit to Le Farm, we all left full and happy.  Like I said, we’ll be back on Tuesday so that shows how good The Whelk is.  If you are around Westport, you need to give The Whelk a try.  If you are like us, one trip just won’t be enough.

Answer:  So what is a whelk?  A predatory marine mollusk (family Buccinidae) with a heavy, pointed spiral shell, some kinds of which are edible.  As Bill Taibe has said, calling his restaurant Le Mer would have been too easy.

Short Ribs With Tagliatelle

I really haven’t gotten out the pots and pans and did some real cooking since the New Year began, so I thought the long President’s Day weekend was the perfect opportunity for me to get back into the swing of things.  With my annual beginning of a new year diet and a busy work schedule over, the long weekend seemed perfect for me to get back into the kitchen.  Even though we’ve had a very mild Winter, the temperatures are still dropping below freezing, so I thought some comfort food was in order.  With that in mind, I settled on short ribs with tagliatelle.  Short ribs that simmer on the stove for an entire afternoon with a condensed sauce containing minced vegetables, beef broth and red wine sounded perfect.  This thick and rich sauce is then spooned over tagliatelle, which are long, thin, flat strips of pasta about 1/4 inch wide.  It is very similar to fettuccine.  This recipe is an old Giada recipe given to me by a friend and has been slightly modified from the original.  The final result can be a little dry at times, so follow the recipe and save some pasta water to moisten the dish up if it does turn out to be on the dry side.

Ingredients:

  • 3 tablespoons olive oil
  • 2 ounces chopped pancetta (about 1/2 cup)
  • 2 1/2 pounds short ribs
  • Salt
  • Freshly ground black pepper
  • 1/4 cup all-purpose flour
  • 1 medium onion, chopped
  • 1 carrot, chopped
  • 1/2 cup fresh parsley leaves
  • 2 cloves garlic
  • 1 (14-ounce) can tomatoes (whole or diced)
  • 1 tablespoon tomato paste
  • 1 teaspoon chopped fresh rosemary leaves
  • 1 teaspoon dried thyme
  • 1/2 teaspoon dried oregano
  • 1 bay leaf
  • 2 1/2 cups beef broth
  • 3/4 cup red wine
  • 1 pound fresh or dried tagliatelle

Directions:

Place the olive oil in a large heavy soup pot over medium heat.  Cook the pancetta until golden and crisp, about 4 minutes.  Meanwhile, season the short ribs with salt and pepper, and dredge in the flour.  Using a slotted spoon, remove the pancetta from the pan and set aside.  Add the short ribs to the pan and brown on all sides, about 7 minutes total.

Meanwhile, combine the onion, carrot, parsley and garlic in a food processor and blend until finely minced.  Then add the tomatoes and tomato paste and pulse.

Once the short ribs are browned, carefully add the mixture from the food processor to the pot.  Return the pancetta to the pot and stir.  Add the rosemary, thyme, oregano, bay leaf, beef broth and wine.  Bring the mixture to a boil.  Reduce the heat and simmer, covered, for 1 hour and 15 minutes.  Remove the lid and simmer for another hour and a half, stirring occasionally.  Remove the meat and bones from the pot.  Discard the bones.  Shred the meat and return it to the pot.  Season with 1/2 teaspoon salt and 3/4 teaspoon pepper, or to taste.

Bring a large pot of salted water to a boil over high heat.  Add the pasta and cook until tender but still firm to the bite, stirring occasionally, about 8 to 10 minutes for dried pasta and 2 to 3 minutes for fresh.  Drain the pasta, reserving 1 cup of the cooking liquid.  Add the pasta to the pot and stir to combine.  Add the reserved pasta liquid 1/4 cup at a time, if needed, to moisten the pasta.  Transfer to serving bowls and serve immediately.

2011’s Top 11 – Decided By You

JoJo the Yorkie and I curled up yesterday to pick the top 11 stories that we posted during 2011 here on Acorns On Glen.  Some of us curled up a little too much.  Can you see where JoJo starts and the faux fur blanket ends?  We started this blog in February as a way for us to realize and then give thanks for all the great things that happen in our lives.  You just can’t take life for granted and this blog is a great way for us to reflect and cherish the fact that we have great family, great friends and now a whole group of great people that visit Acorns On Glen on a frequent basis.  We’ve been blown away by the number of people that stop by and read our posts.  Thanks to all of you who have welcomed us into your lives this year.  The posts that have been visited the most are varied, but the majority of the top 11 seems to show that all of you, our readers, like good food and how to cook it.  Here are 2011’s top 11 posts:

1.  Funky Italian Stuffed Peppers

Our Notorius B.I.G. (Brooklyn Italian Grandmother) heads the list with her great recipe for cubanelle peppers.

2.  South Carolina’s Unbelievable Angel Oak

You liked our sight-seeing trip down in Charleston, South Carolina.

3.  Time For Tuberous Begonias

The story about the begonia tubers I’ve had for years is our most viewed gardening post.

4.  Lots Of Bling – Christie’s Important Jewels

You like jewelry, eh?  Yes you do, big stones with lots of sparkle is what you like.

5.  The Man Behind The Curtain

My bio….you like me, you really like me.

6.  A Toadstool Birthday Tea

Our first guest blogger shows us how to throw a great birthday tea for the little ones.

7.  Luna Moth Or Not – You Be The Judge

A truly magnificent discovery that landed on the back side of our house and stayed for a few days so that we could marvel at it.

8.  A Field Trip To Le Farm Restaurant

Just like us, you enjoyed the cooking of Bill Taibe at his Westport, CT restaurant, Le Farm.

9.  Chocolate Caramel Tart With Fleur De Sel

Who can resist this sweet-salty flavor combination?  We can’t!

10.  Thinking Of My Citrus House Guests

Our little orange and lime trees impressed this year and even gave us a few pieces of fruit.

11.  Meatball Mania With Sauce

Finishing off just the way we started, another hit dish from Notorius B.I.G.

So here’s to everyone who has helped make Acorns On Glen a success.  We are truly humbled by the response, along with your words of encouragement, and can’t wait to share 2012 with you.  We want to wish everyone a Happy New Year (wish I could pass everyone a glass of champagne now) and may 2012 bring you great joy and happiness beyond your wildest imagination.

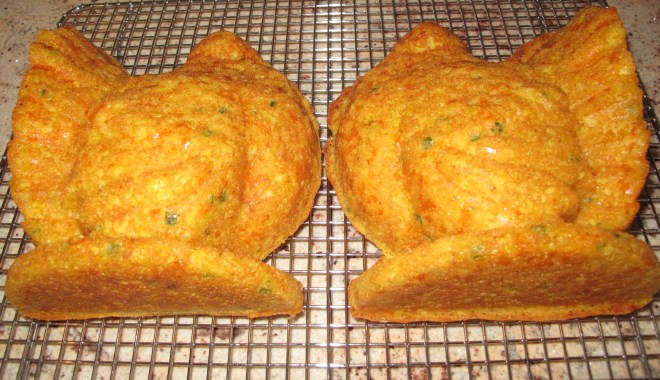
Gobbling Up Our Turkey Shaped Cornbread

This is what happens when Martha Stewart inspires you way too much.  I try not to watch her show much anymore because I am the type of person that sees her do something and then I become obsessed with the idea and have to try it.  The problem is that I only complete about 50% of the things that I see her do.  Sure, I made this Thanksgiving cornbread in the special turkey pan she used, but still lingering are projects that I haven’t done, like making wax initials with a letterpress, wax sticks and a glue gun, glittering some pine cones for a crystal bowl I have on my dining room table and embossing my velvet Christmas stockings with a faux bois finish.  I’m serious, I actually have everything you need to do these projects.  They are in my hall closet.  However, the only thing I don’t have is time.  Oddly enough, when I do have the time, I just don’t have the energy.  I see Martha wincing now.

I turned on Martha’s show only once leading up to the Thanksgiving holiday.  It was the show where she made these cornbread turkeys.  I was obsessed and knew that it was happening again….the urge to make something beautiful that she made.  I ran to my computer and frantically searched for the right turkey mold pan.  I found it on Amazon.com.  I had it sent via overnight FedEx, which cost me about as much as the pan.  I received the pan late Wednesday evening and knew that it was perfect for the recipe to be made on Thanksgiving morning.  I was right on schedule.

The cornbread recipe to fill the mold was very simple to make.  The cornbread is actually a little more dense than the cornbread recipe I usually make, but still very delicious.  The addition of the jalapeno peppers and the cheddar cheese was a nice addition to the cornbread recipe.  They both gave the bread a little punch.  Here’s how I did it:

Ingredients:

  • Vegetable oil cooking spray
  • 1/2 cup plus 2 tablespoons (1 1/4 sticks) unsalted butter
  • 2 cups fresh (from about 3 ears) or thawed frozen corn kernels
  • 3 jalapeno chiles, minced (ribs and seeds removed for less heat, if desired)
  • 2 shallots, minced
  • 1 cup plus 2 tablespoons all-purpose flour
  • 2 1/4 cups yellow cornmeal
  • 1 tablespoon plus 1 teaspoon coarse salt
  • 3/4 teaspoon freshly ground pepper
  • 3 tablespoons sugar
  • 1 tablespoon plus 1 1/2 teaspoons baking powder
  • 3/4 teaspoon baking soda
  • 3 large eggs
  • 2 1/4 cups buttermilk, well shaken
  • 1 1/2 cups grated cheddar cheese

Directions:

Preheat oven to 350 degrees. Coat two 5-cup turkey-shaped pans with cooking spray.  Melt 1/2 cup butter and let cool.

Melt remaining 2 tablespoons butter in a skillet over medium-high.  Cook corn, jalapeno, and shallots, stirring occasionally, until soft, 4 to 6 minutes.

Whisk together flour, cornmeal, salt, pepper, sugar, baking powder and baking soda in a large bowl.  Make a well in the center of the mixture and add eggs; whisk eggs into flour mixture.

Whisk together melted butter and buttermilk; stir into flour mixture, along with corn mixture and cheddar.  Mix until well combined.

Divide the batter evenly between prepared pans; smooth tops.  Transfer to oven and bake, rotating pans halfway through, until a cake tester inserted into the centers comes out clean, 30 to 35 minutes.  Let cool slightly before inverting onto a wire rack.  Serve warm or at room temperature.

Christmas is right around the corner.  I know Martha will do something that I will see or hear about and the free-for-all will begin all over again.  What will it be?  Hand felted Santa suits, carve your own reindeer antlers, a simple dinner for 100?  If you find out, please don’t let me know.  Well, maybe just a hint is fine.  Do you stalk have a favorite famous personality that you like and follow?

Fried Ricotta Cheese – Two Ways

This is the question-if you decide to fry ricotta cheese, do you make it a savory appetizer or a sweet dessert?  That was the decision we had in front of us and so we decided to do both in the same meal.  This means we started off our little dinner party with a savory fried ricotta dish and ended the meal with the same fried ricotta made into a sweet dessert.  Most people equate fried cheese to the fried mozzarella sticks you get in your typical bar or tavern fare.  However, our Italian recipe for fried ricotta, known as ricotta fritta, has a subtle texture and flavor that works better being turned into a first course or dessert than its more famous mozzarella cousin.  The creamy texture of the ricotta fritta also cannot be beat.  So here is our recipe for ricotta-two ways.

Ingredients:

  • 15 ounces fresh ricotta , drained overnight
  • 1/2 cup all-purpose flour, for dredging
  • 2 cups bread crumbs
  • 2 large eggs
  • Pinch of kosher salt
  • 1/2 cup vegetable oil

Savory:

  • 2 cups marinara sauce
  • Fresh basil leaves

Sweet:

  • 2 cups fruit jam or preserves (I used a jar of cherry preserves)
  • 1 cup whipped cream

Directions:

Put the drained ricotta in a bowl.

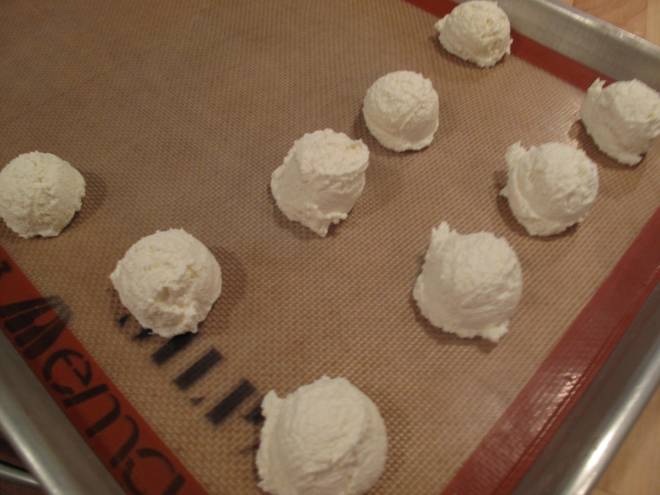
With an ice-cream scoop, scoop out tablespoon-sized balls of ricotta, and set them on a parchment-lined tray or sheet pan (you should have about twenty-four ricotta balls total).  Set the tray in the freezer, and chill the balls until firm, about 30 minutes.

Spread the flour on a small plate and the bread crumbs on a large plate. Whisk the eggs with a pinch of salt in a wide, shallow bowl.

Dredge the balls in the flour and gently flatten them into thick patties.  Coat the patties in egg, then dredge them until well coated in the bread crumbs, but not heavily so.  Return the breaded patties to the parchment-lined tray.

When you are ready to fry the patties, pour the vegetable oil in the skillet and set over medium heat.  The oil is ready when the tip of a patty sizzles on contact.  Drop the patties into the skillet in batches, so they are not crowded, and fry for 1 to 2 minutes on each side, until golden brown and crispy.  Lift them from the skillet with a slotted spatula and drain briefly on paper towels.  Serve ricotta fritta while still hot.

For a savory appetizer or main course:  spoon a pool of hot marinara sauce onto each serving plate, set 3 fried patties in the sauce and scatter basil on top.

For a dessert dish:  top 3 patties with warmed preserves (or any fruit jam or poached fruit) and whipped cream.

In our little experiment, we found we liked the sweet version the best which is surprising because most of us at the dinner are not real dessert lovers.  Somehow the sweet taste of the preserves and cream played nicely off the creamy and tangy flavor of the fried ricotta.  Don’t get us wrong….there wasn’t any of the savory fried ricotta left over, so it must have been a crowd pleaser as well.  We’ll definitely be giving this versatile dish another go in our kitchen.  We hope you will too.  Do you have any cheese recipes that you use for dessert or for an appetizer that you would like to share?

New Advances In Corn Bread Technology

This is fresh, hot corn bread being cut into six generous wedges for serving.  Corn bread seems to be a very sensitive topic for people in the South.  When we were on vacation, I saw more than a couple of restaurants that made claims to serving the best corn bread in Charleston.  One claim I saw said it was the best due to the use of white corn meal.  Another claim said that they had the best because they used local stone-ground yellow corn meal.  I didn’t know there were so many choices available in the art of corn bread making as I usually enjoyed the one and only Jiffy-boxed corn bread as a child and have rarely eaten corn bread as an adult.  Now that we are back in Connecticut and still cooking a lot of Southern classics, I decided to look around and determine what I would consider the best corn bread recipe on the market.  Here is the first contender, again from the ‘Lee Bros. Southern Cookbook‘.  Since they haven’t steered us wrong since our return, I figured I’d give their recipe the first shot.  What interested me in this recipe was the title, Crispy Corn Bread.  I was envisioning a soft center and a crispy and chewy crust on top and that is just what we got.  To achieve this crispy corn bread, all I needed was a 12 versus a 9 inch cast iron skillet.  The larger skillet is the trick to obtaining corn bread that has that delicious corn flavor and carmelized crust, but because the batter lies thinner in the pan and only gets up to about a half-inch thick, you double the crispiness of the bread while retaining its moistness.  Because the crust-to-crumb ratio is very high, this corn bread is like a moist flatbread with a big corn taste.

Ingredients:

  • 1 tablespoon unsalted butter
  • 1 1/2 cups stone-ground cornmeal (yellow or white, the choice is yours)
  • 1 teaspoon baking powder
  • 1 teaspoon baking soda
  • 1/2 teaspoon salt
  • 2 teaspoons sugar (I added one more teaspoon than the recipe called for because I like it a little sweeter)
  • 1 large egg
  • 1 1/2 cups whole or low-fat buttermilk
  • 2 tablespoons unsalted butter
  • Butter and honey (or whatever) for spreading

Directions:

Preheat the oven to 450 degrees.  Grease a 12-inch skillet with the butter, leaving any excess in the pan, and place it in the oven.

In a large bowl, sift the dry ingredients together.

In a medium bowl, whisk the egg until frothy and then whisk in the buttermilk.  Add the wet ingredients to the dry ones and mix thoroughly.  Melt the butter in a small pan over low heat and whisk the butter into the batter.

When the butter in the large skillet is smoking, carefully remove the skillet from the oven and swirl around the butter to coat the bottom and sides evenly.  Pour the batter into the skillet.  It should sizzle.  Bake for 15 minutes, or until the top of the bread is golden brown and the edge has pulled away from the side of the skillet.  Remove from the oven.  Cut the cornbread into 6 wedges in the skillet and serve hot, with the butter, honey or any other spread of your liking.

This corn bread was very good served in a big wedge beside our chicken-fried steak with vidalia cream gravy.  This was some good Southern eating.  Are you getting the point that I am in love with the Lee Bros. cookbook?  So far, no disappointments and some great food.  I’m giving this corn bread a score of 8 because I thought it needed to be a little sweeter (again, this is why I increased the sugar content in the recipe above).  Give this quick and easy corn bread recipe a try and enjoy the crispy crust the next time you are cooking up your favorite Southern dish.  Do you have any tricks for making good, old-fashioned corn bread?

Still Southern In Connecticut – Chicken Fried Steak

This is some more good Southern eating.  If you couldn’t tell, we have remained Southern ever since our return from our Charleston, South Carolina vacation.  We have continued to research and read about the South Carolina low country and cook from our Southern cookbooks.  Did you notice that I said cookbook(s)?  Yes, we started with one and are now up to three Southern cookbooks.  With the kind of food we’ve been eating, what could be bad with more cookbooks?  Our latest dish was Chicken-Fried Steak With Vidalia Cream Gravy.  The pros of the dish:  it was delicious with a crispy, fried batter covering a thin layer of steak and was seasoned perfectly thanks to a special dredge that utilizes corn meal, flour, bread crumbs and salt and pepper.  The cons:  it is a little messy to make because any time you have to dredge steak through a corn meal coating, egg and buttermilk and then more corn meal coating, you are going to have some mess.  The other con:  not all people are comfortable frying in front of a big pan of super hot oil.  If you can get over these two cons, then you will be in for some delicious Southern comfort food that was a big hit at our dinner table the other night.

Again, this recipe comes from the favorite of our new Southern cookbooks, ‘The Lee Bros. Southern Cookbook’.  Chicken fried steak is a great example of where leaner, tougher and cheaper cuts of beef actually perform better than the fattier, tenderer rib eyes and strips.  The steak cooks really fast in the heated oil.  I started our dinner with some slices of super fresh heirloom tomatoes and mozzarella cheese drizzled with a balsamic vinaigrette and some sea salt.

A big slab of cornbread was right beside the chicken fried steak and gravy.  Dessert was the remainder of our red velvet cake from the other day, since it kept very well in the refrigerator.  This meal made us proud to be Southern (ok, I know we are not, but I thought I’d slip that in).

Ingredients:

For the All-Purpose Fry Dredge:

  • 1 cup all-purpose flour
  • 6 tablespoons stone-ground cornmeal
  • 4 teaspoons salt
  • 3 teaspoons freshly ground black pepper
  • A large sprinkling of bread crumbs for quick browning

A couple of notes:  this is a double batch from the original recipe in the cookbook.  I found that I needed more dredge than originally specified.  Also, it is important to find stone-ground cornmeal, which is much lighter and less coarse in consistency than non stone-ground.

Directions:

In a medium bowl, sift the flour, cornmeal, salt and pepper together twice.  Stir in the bread crumbs and turn out onto a flat surface and dredge according to recipe instructions making sure to shake off any excess.

Ingredients:

For the Chicken-Fried Steak and Vidalia Cream Gravy:

  • Peanut oil for frying
  • 1 large egg, beaten
  • 1/2 cup whole or low-fat buttermilk
  • Four 6-ounce beef top round steaks, about 1/2 inch thick (look for meat labeled top round bracciole meat)
  • 1 jumbo Vidalia onion (about 12 ounces), trimmed, peeled and thinly sliced
  • 2 tablespoons unsalted butter
  • Kosher salt to taste
  • 1 teaspoon all-purpose flour
  • 1/2 cup chicken broth
  • 1/4 cup whole milk
  • 1 teaspoon freshly ground black pepper, plus more to taste
  • All-purpose dredge

Directions:

Preheat oven to 200 degrees.  Place an ovenproof platter on the top rack.  In a 12-inch skillet or saute pan with a candy thermometer clipped to it, place enough peanut oil into the pan to fill it to half way and heat the oil over medium-high heat to 350 degrees.

  Be careful…very hot!

Whisk the egg with the buttermilk and pour into a shallow bowl.  Place the fry dredge on a wide plate.  Working with 1 steak at a time, envelop the steak in a single sheet of plastic wrap and pound several times with a mallet to tenderize.  Coat the steak in the dredge and shake off any excess.  Dip in the egg wash to coat both sides.  Allow the excess to drip off and then coat again in the dredge.

  See, a little messy!!

Shake off the excess and place the steak immediately into the hot oil.  Fry, checking the temperature of the oil and adjusting the heat as necessary to maintain the temperature at 350 degrees, until golden brown, about 2 minutes per side.  Transfer to a plate lined with paper towels to drain off any excess oil and then transfer to the platter in the oven.  Repeat with each steak.

When all the steaks have been fried and are warming in the oven, discard the used oil in the skillet and return the skillet to the burner.  Add the onion, the butter and a pinch of salt and saute over medium-high heat until the onion is soft and translucent, about 4 minutes.

In a small bowl, vigorously whisk the flour into the broth until no lumps are left.  Pour the broth and the milk into the skillet and add the pepper.  Bring to a simmer and simmer gently, stirring, until the gravy has thickened to the consistency of melted ice cream.  Season to taste with salt and pepper.

To serve, place the steaks on a dinner plate and ladle a generous amount of gravy over each.

Whoever came up with putting the crispy part of fried chicken onto a steak should be considered a genius.  The mellow cream gravy with the onions combined with the well-seasoned coating and the steak made for a delicious main course.  So we figure if we continue cooking like this for at least another week, we should get our honorary Southern citizenship papers or at least be allowed to speak with a slight Southern accent.  Change it up for your family and try this chicken fried steak and gravy recipe.  It is a delicious change of pace.  Have any of your vacations inspired you to change it up in your kitchen?

Charleston’s Hominy Grill Restaurant – Yum!

This is one of the first things you see when you arrive at the Hominy Grill in Charleston, South Carolina.  Painted on the side of the building, this waitress seems to assure you that inside you will soon be eating some great home-cooked food just like your Grandma used to make.  Nationally acclaimed and locally beloved, the Hominy Grill is a Charleston institution serving classic Southern specialties.  No cans are opened at the Hominy Grill.  All of the food is prepared from scratch with fresh, locally raised ingredients.  Chef/proprietor Robert Stehling first learned to cook at Crook’s Corner in Chapel Hill, NC.  He then worked for several years in New York before moving to Charleston where he opened the Hominy Grill.  He received the prestigious James Beard Best Chef Southeast award in 2008.

When we first arrived, we knew we would have a little wait given the number of people who were outside on the patio already waiting for a table.  Given the gorgeous weather that Charleston is known for, waiting outside for our table was nice.  Although there wasn’t a bar to stand at, the Hominy Grill does have a window where you can go up to and order whatever it is you would like to drink during your wait.

After about thirty minutes, it was our turn to eat.  The six of us sat down at a table inside a nice bright room with what appears to be an old-fashioned stamped tin ceiling.

Next up, it was time to read the regular menu and review the daily board of specials.  Almost of the dishes offered were Southern classics made with fresh ingredients.  Right off, we knew that we would hit all three courses in our eating adventure–appetizers, main course and dessert.

We started off with fried green tomatoes with ranch dressing for the entire table.  Is there anything more Southern than that?  Did you know that there is not a special variety of green tomato that you grow to use when you make your fried green tomatoes?  You just need to gather unripened, green tomatoes off the vine and batter and fry them.

After polishing off the fried green tomatoes in record time, it was time to move on to the main course.  Take a look at this delicious dish of shrimp and grits, another Southern classic.  The shrimp was sautéed with mushrooms, scallions and bacon and then served over cheese grits.  In this dish, the bacon actually gave the dish a nice smoky and salty flavor when up against the smoothness of the grits and the tender shrimp.

What would the South be without something fried and then served with gravy and a biscuit?  The Hominy Grill did not disappoint and several of us ate the Big Nasty Biscuit with a fried chicken breast smothered in cheddar and sausage gravy.  When we saw this, all we could do is trick ourselves into thinking it only had 200 calories in it and then dig in.  Talk about some good eating!

BBQ was also on order at the Hominy Grill.  Southern barbeque is more vinegar based than other barbeques that you may have eaten.  I like the bite that this type of barbeque offers.  Here is the BBQ chicken sandwich with slaw.  Vinegar BBQ heaven!

Are you ready for dessert?  We were.  We kept it simple and delicious as you can see.  Nothing light about butterscotch pie and a chocolate brownie with vanilla ice cream, huh?  The butterscotch pie was creamy and delicious.  It has been quite a while since I had eaten butterscotch pie and this was a light and flavorful treat.

Now onto the chocolate brownie with homemade vanilla ice cream.  Here’s the question–have you ever met a brownie a la mode that you didn’t like?  I haven’t and the Hominy Grill’s selection was as good as it looks in this picture.

What a great brunch!  At this point in a meal and after all of this food, all you can do is either go back to home base and take a long nap or walk it off.  We thought it best to do some walking which is probably the right choice after you just finished devouring something called the Big Nasty Biscuit.

When we go on vacation, we do some sight-seeing, but for the most part our favorite part of a vacation trip is getting to know the locals through eating.  The Hominy Grill in Charleston really got us acquainted with the food of South Carolina’s low country.  Given that they try to utilize fresh and local ingredients, the food was really delicious.  We hope you enjoyed our little eating frenzy at the Hominy Grill….we sure did.  Do you enjoy dining out a lot when you are on vacation?

Stuffed Artichokes In A Jiffy

This is a great way to make stuffed artichokes in a quick and dirty manner.  There is the traditional way, which involves clipping and trimming whole artichokes, stuffing them and then steaming them for a long period of time until they are tender and then there is this way.  I’ll admit that the traditional way is best, but when you are in a hurry, nothing impresses more than this quick stuffed artichoke treat.  I have modified this recipe from one that I found in an old Italian cookbook.  Remember, I’m not keen on lemon so I took the lemon juice amount down and I also brought the amount of breadcrumbs down as well.  Because we are in a hurry on this dish (remember?), I used store-bought seasoned breadcrumbs and not ones that I make myself.  GASP!…I can hear it now….forgive me food gods.  Since I am in the confessing mood, I also used bottled artichoke hearts from the Italian section of the supermarket instead of fresh artichokes.  THUD!….the foodies that didn’t quit reading after the breadcrumb disclosure are now picking themselves up off the floor.  I think this is a good recipe.  Again, there are days when you have all the time in the world to cook and there are days when you need something quick, yet homemade.  This is one of those dishes.

Ingredients:

  • 1 cup seasoned breadcrumbs
  • 1/4 cup finely chopped fresh flat-leaf parsley
  • 1/4 cup freshly grated Parmesan cheese
  • 1/4 cup freshly grated Romano cheese
  • 1 tablespoon combined dried herbs such as thyme, oregano and savory or herbs sold as Italian seasoning
  • 1/2 teaspoon coarse salt
  • Pinch of freshly ground black pepper
  • 2/3 cup extra-virgin olive oil
  • 2 tablespoons fresh lemon juice
  • 3 cloves garlic, minced
  • 30 ounces of bottled artichoke hearts, drained

Directions:

Preheat the oven to 325 degrees.  In a medium bowl, mix together the breadcrumbs, parsley, cheeses, dried herbs, salt and pepper.  Set aside.

In another bowl, whisk together the olive oil, lemon juice and garlic.  Set aside.

Rub olive oil inside a 13 x 9-inch baking dish.  Lay the artichokes in a single layer in the baking dish.  Evenly distribute the crumb topping over the artichokes, pushing it down in between the hearts.  Drizzle the dressing all over the crumb topping.

Cover the dish with foil and bake for 30 minutes.  Increase the temperature to 375 degrees, remove the foil and bake an additional 10 to 15 minutes or until the top is golden brown all over.

Simple, quick and really tasty.  This is a nice dish to take to the table when you are pressed for time.  In our quest to make all things Italian, this is a dish that gets high marks from even our harshest critics.  So the next time you are in the mood for stuffed artichokes and don’t have the time (or the patience) to make them the old-fashioned way, give this quick version a try.  What recipes do you have for artichokes that you make in your kitchen?