Time For Tuberous Begonias

This is a set of begonia tubers. More specifically, they are a set of Blackmore and Langdon begonia tubers.  For over 100 years, Blackmore and Langdon have offered tuberous begonias that produce spectacular flowers in a wide range of colors over a very long season and do all of this in shade.  In the North where I live, the tubers should be started indoors in late Winter or early Spring to bloom by Summer.  They need well-drained soil, indirect light and moderate temperatures.  While not as popular as the wax begonias that are planted more in beds, tuberous begonias are more spectacular and are most commonly planted in containers or boxes.

Its scientific name, Begonia tuberhybrida, means they grow from a tuber (similar to a bulb) and its many varieties are hybrids.  As is often the case with hybrids, there are different varieties.  The tuberous begonia flowers come in all shapes, sizes and colors.  Some flowers are upright, while others loosely hang down.  Some are single petaled, others, probably most, are double petaled.  The male flowers tend to be quite large, up to 6 inches in diameter, and showy.  The female flowers are smaller, 1 to 3 inches in diameter, but still showy.  About the only common factor among the varieties are the leaves, which are almost always dark green in color, quite large and arrow shaped.

I have had these two begonia tubers for quite some time.  I purchased both tubers from White Flower Farm, http://www.whiteflowerfarm.com.  The ‘Picotee’ tuber has been growing in a pot on my porch for over eight years.  The ‘John Smith’ tuber has been around since 2008.  When the plants die off in October, I simply dig the tubers out of the soil, break the spent stems from the tubers and then place them in the basement in wood chips until they are ready to plant again in mid-March.

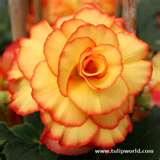
‘Picotee’ has a salmon colored double bloom.  It grows almost a foot tall each year and produces a number of massive sized blooms.  It does not produce scent of any kind.

‘John Smith’ has double, rosebud blossoms that are ruffled in a delicate peach color.  It has the distinction of being the first scented upright begonia. Its fragrance varies from rose-like to a hint of citrus.  The creation of the first perfumed, upright begonia took time, more than ten years.  It was named to honor Blackmore and Langdon’s lead begonia grower, who bred and developed this breakthrough.  ‘John Smith’ was a highlight of the Royal Horticultural Society’s Chelsea Garden Show in 2007.

Every mid-March, I bring my tubers up from the basement and plant them.  I start with 6-to-7″ pots.  I fill each pot about two-thirds full of organic potting soil and place one tuber into each pot’s soil.  It is important to put the tuber’s concave side facing up.  Notice the small buds that appear on the tuber.  This is the year’s new growth.

I fill the rest of the pots to the rim with more soil.  Throughout the growing season, I transplant the begonias to bigger pots as the plants grow larger and larger.

To see details on the complete planting process for a tuberous begonia, here is a short video from the growers at White Flower Farm:

I’ll keep you posted on their journey throughout this year.  They have been such a beautiful addition to my front porch for so many years, I really can’t picture my porch without them.  If you have the time and the money (the tubers are not cheap), I encourage you to give Blackmore and Langdon tuberous begonias a try.  You’ll be glad you did.  Do you grow any spectacular plants in your garden that you would like to share on Acorns On Glen?

Germination Nation

This is the beginning of the vegetables that we are going to eat this Summer and Autumn.  Hopefully, I should say, hopefully this is the beginning of the vegetables we are going to eat.  Why?  Because this is the first year since we built the raised bed garden that we are going the distance.  Yes, we are attempting to start our garden from seed this year versus a mix of seeds we directly sow into the ground along with nursery-purchased plants for those vegetables that don’t grow so well from a seed planted in mid to late-May.  Earlier in February, we put together the Jump Start grow light in our basement.  This was the first step for seed germination.  Now it is time to plant the seeds that we ordered earlier in the month and let them grow under the light until we plant them in the garden from mid to end-of-May.  I’ve decided to plant the seeds in two batches.  The first batch is seeds that produce plants that grow better in cooler soil.  These are the ones I will plant outside around mid-May.  The second batch is seeds that require warmer soil.  These will be the ones I plant outside at the end-of-May.  You know we had the grow light and the seeds.  Now let’s take it from there and show you the way we are starting our seeds for the 2011 garden.  It all starts with some soil.

The first thing we learned is that you should avoid regular potting soil.  So we purchased a twenty quart sack of germination mix from our friends at Johnny’s Selected Seeds, http://www.johnnyseeds.com.  The soil is named ‘Johnny’s 512 Mix’.  512 Mix is made from a 1/2″ screened blend of sphagnum (brown) and sedge (black) peat mosses, compost, and perlite.  The mix contains enough nutrients to carry most plants from seed to transplant.  The mix also does not require as frequent watering as many other brands that are out there.   It is excellent for soil blocks, trays and small containers.

After moistening the soil with some water, we began the step by step utilization of our pretty amazing seed starting kit, the APS 24.  The Accelerated Propagation System (APS) is a complete self-watering growing system that makes starting plants from seeds a relatively easy task.  It is a five-part system that seems to take most of the work out of seed starting.  The five parts are as follows:  A)  The greenhouse cover that traps moisture and helps to keep the soil warm while under the grow light.  Warm soil is a must have for seed starting.  B)  The planting tray used to hold the germination mix and the seeds.  This is the main growing area.  C)  The capillary mat that is the watering system used to give the seeds the water they need to grow.  D)  A pegboard stand to put the seeds on top of while allowing water to reside on the bottom.  E)  The water reservoir to hold the water so that frequent watering directly onto the seeds or new plants is not necessary.  Here is a graphic from Gardener’s Supply Company, http://www.gardeners.com, where we bought the APS 24.

Here is our step by step process:

First, we firmly pressed the soil into each planting cell so that it will have good contact with the capillary mat.

Second, we moistened the capillary mat and then laid it on the pegboard stand with the capillary mat extending over the unnotched end.  This is so that it will be laying in the water reservoir and will continually soak up water as it dries out.  This will keep the germination mix moist throughout the growing process.

Third, we placed the pegboard stand and capillary mat in the water reservoir, peg side down.  We needed to make sure the extended end of the capillary mat was inside the water reservoir for watering purposes.  We then filled the water reservoir with water at the notched end of the pegboard stand.  We can now check the level of the water by looking at the water gauge we bought that fits into the notched opening of the pegboard stand.

Next, we placed the planting tray on top of the capillary mat and pegboard stand, then lifted it up to make sure the soil touched the capillary mat under each cell.

We then planted two seeds into each cell and marked each row of cells with a marker in order to be able to know what seed is planted.  Each cell is designed to hold one plant.  As each seed grows, we will decide which one looks the stronger of the two planted in each cell and cut out the weaker one.  The first batch of seeds planted are the ones that enjoy cooler soil.  They are eggplant, cabbage, brussels sprouts and cauliflower.  The second batch of seeds that we plant will be at the beginning of April and consist of seeds that prefer a warmer soil condition.  This will include tomatoes and artichokes (a fun test to see if they can grow in Connecticut).

After planting, we gently watered the soil thoroughly from above and placed the greenhouse cover on top of the planting tray.  Watering the soil from above ensures that the soil will have good moisture contact with the capillary mat and continue to wick moisture to the germinating seeds. The greenhouse cover will keep the soil moist and warm and help our seeds quickly germinate.  We will remove the greenhouse cover as soon as our plants emerge. 

Our last step was to place the seeded APS 24 under the grow light.

We are keeping the grow light on an electric timer and keeping the light on for 14 hours a day.  Here’s hoping that we have success and all of our seeds sprout.  It is our first time growing plants from seeds, so you never know, do you?  Keep your fingers crossed for us.  We are excited to see the results in the coming months.  We hope you are too!  Do you grow your garden plants from seed or do you buy them from a nursery?

Thinking Of My Citrus House Guests

This is a picture of our two most recent house guests.  While they are living in the house right now, they will be moving outside later, in the early Summer.  What you are looking at are two dwarf citrus trees that we purchased with the hopes of getting some citrus fruit from them to use in the kitchen.  Our two house guests traveled all the way from California to be transplanted into clay pots here on Glen Road.  Come and watch from their arrival to transplant.  Here’s hoping for some oranges and lemons later this season!

Our citrus trees are a dwarf variety, which is a plant that is grafted onto special rootstock that prevents the tree from growing too large.  We chose two to three-year-old dwarf trees as they will produce blooms and fruit much faster than a younger tree.  From research on various internet sites, we decided to purchase our trees from Four Winds Growers, http://www.fourwindsgrowers.com.  Four Winds Growers is located in Winters, California.  Their founder began propagating and growing quality dwarf citrus trees in California about sixty years ago because he believed the gardening world needed more choices than just the little orange dwarf trees available only from Florida at the time.  Today, this four generation, family owned nursery continues the tradition. They now grow over 250,000 quality dwarf citrus trees for containers and home gardens each year.

We selected two varieties to grow in our home.  An ‘Improved Meyer’ lemon tree and a ‘Calamondin’ orange tree.  Each was noted as being excellent for beginners and for container citrus gardening–indoors and out.

‘Improved Meyer’ dwarf lemon is a favorite cooking lemon.  This small, evergreen tree bears fragrant white flowers and lovely, yellow-orange fruit.  Its small habit, glossy, deep-green foliage and year-round attractive form make it excellent for the home garden.  More cold tolerant than the standard lemon, this variety is also sweeter and has fewer seeds.  Grown in containers, it can easily be moved indoors in colder climates, where it will continue to produce fruit.

The ‘Calamondin’ orange, a cross between a kumquat and an orange, is a favorite among gardeners for its variegated foliage and its small ornamental fruit.  The flowers are extremely fragrant and the fruit, which is very sour, is used to make marmalade.  Once established in a pot, the ‘Calamondin’ orange is very easy to grow.  Keep it in full sun and fertilize it twice a month in the active growing season.  It will flower in late Winter or early Spring and fruit thereafter. The fruit will hold on for an awesome ornamental display for months.

The first time we ordered from Four Winds, our order was cancelled.  The simple reason–it was too cold of a journey.  The second time we ordered, the weather was warmer and we chose two-day shipping.  When the trees arrived, they had an interesting attachment above the root.  The attachment was a warming sachet.  Its purpose was to keep the trunks of each tree warm during shipping.  Even when we opened the trees two days later, the sachet was still warm to the touch and helped keep the trees alive during their journey from California to Connecticut. 

A well-drained soil was encouraged in the research that we performed.  It was recommended to use a slightly acidic (pH 6 to 7), loam-based potting mix.  Instead of mixing our own, we purchased a premixed potting soil formulated specifically for citrus trees.  We moistened the soil and then placed it into two pots with each tree.

A pot with adequate drainage is essential.  We could select either a clay, ceramic or plastic pot slightly larger than the root ball.  We went with clay pots that have several holes in them at the bottom.  We also filled the drainage dishes with stones to provide air circulation.  Here is the finished product after transplanting:

Here is the ‘Improved Meyer’ lemon tree.

Last but not least, here is the ‘Calamondin’ orange tree.

Both trees are now resting peacefully in our kitchen in a bright and sunny, south-facing patio door.  We will need to get started hunting for marmalade and Meyer lemon recipes.  Maybe we shouldn’t get ahead of ourselves….we can wait until at least they bloom or form fruit before we look for recipes.  We can’t wait for that to happen.  We’ll keep you posted on their success here on Acorns On Glen.  Do you have any great citrus recipes that you can share here on Acorns On Glen, especially orange marmalade or Meyer lemon recipes?

Meet My Garden

This is my garden.  You’ve probably noticed that I’ve been busy this week introducing you to all of my favorite places here on Glen Road.  I want you to see how they look now, so we can marvel together on Acorns On Glen over what they will become from now until Autumn.  My garden sits at the back of the property and is outside of the fence that guards the rest of the yard from visits by deer.  We learned in our very first year that while Bambi is cute, Bambi will also eat every last plant that can be found on your property.  The next year we installed a six foot tall fence in the woods that surrounds our property in order to keep the deer out.  During all the seasons, except Winter, the forest growth makes the fence appear almost invisible.  Because we built the garden outside of the fence, we installed protection to ensure our garden is not wiped out by deer like we experienced in our first year on Glen Road.

The actual garden is approximately 20 feet long by 10 feet wide.  Each of the four beds inside is close to 8 feet long by 4 feet wide with a white rock path that seperates each bed.  I try to organically garden as much as possible, so it was important to me that all of the construction material used was not chemically treated in any way.  Many raised bed gardens use treated wood to avoid decay, but I opted out of that.  I didn’t want any chemicals seeping into the soil that we use to grow and then those chemicals getting into me through the vegetables that we plant, harvest and eat.   

I love the fact that my garden is surrounded by forest on all sides.  I didn’t need to remove any trees in the area I selected.  There was nothing in this area before the garden was constructed except for brush and rock.  The area is also very sunny, which is important if you hope to grow strong and healthy vegetables. 

My garden is my sanctuary.  I go there to garden, of course, but it also serves as a place that provides me great amounts of peace and tranquillity after a long week at work.  My garden also acts as my psychiatrist because I become calm and centered in the garden and then I am able to make the best decisions around what I need to do and what I do not need to do in my life.  The garden also connects me to nature.  I marvel at the lessons that nature teaches you if you just stop and take notice.  My garden is also my way of meditating.  There is nothing better than hearing the sound of wind, the warmth of sun on your shoulders, watching a seed grow, the feeling of soil on your hands to center you and make you one with the higher spirit.        

At the current time, all of my beds have a cover crop on them.  The cover crop is primarily winter rye grass and some red clover that I will turn into the soil in April.  As it decomposes into the soil, it will add nutrients to provide the garden with what it needs to grow vegetables.  Think of the cover crop as my garden’s vitamin pill.

In the picture at the top of the post, you will see what appears to be a white blanket covering about half of the soil in one of the raised beds.  This is a floating row cover that is protecting four rows of spinach.  Last Thanksgiving, I put on my thickest Winter coat and gloves and dug four rows where I planted spinach.  I then covered the area with a floating row cover to protect the spinach seeds from Winter snow and ice and the frigid temperatures.  The floating row covers also help to hold some heat in around the soil to help the spinach seeds sprout in the Spring when temperatures get a little warmer.  Spinach is one of a number of vegetables that do the best if grown in cooler temperatures.  It is true because I took up the floating row cover for the day and there were the four rows of spinach at almost an inch high.  Pretty good given the Winter we endured here in Connecticut.  With all the snow and ice, I thought that the spinach was going to be a lost cause.  I’m glad I was wrong!  I hope to be enjoying some spinach with garlic and oil in a few short weeks.  I will permanently remove the floating row cover in the beginning of May when the temperature rises and frost is less likely to occur.


I used two different types of spinach varieties in my Thanksgiving planting.  One was a smooth-leaf spinach which is the traditional kind that most people are used to and the second one was a savoy-leaf spinach, which is a spinach with a more curly leaf. 

  • ‘Space’ is the smooth-leaf variety.  It has medium dark green leaves with are upright and smooth to maybe a little savoyed. 
  • ”Tyee’ is the savoyed-leaf variety.  Again, the folks at Johnny’s Selected Seeds, http://www.johnnyseeds.com, really came through.  They were the first to offer ‘Tyee’ and it is now considered the standard of savoyed spinach for its bolt resistance and vigorous growth.  Dark green leaves with an upright growth habit.  I was told it was ideal for over-wintering.

So now you know where I will be most weekends from now until the early Winter.  The garden is one of my favorite spots and one of my earliest childhood memories.  I will always remember the gardening lessons I received at a young age from my Grandmother and my Father.  Honestly, they were organic gardeners way before organic was cool and necessary in today’s environment.  I have learned all of what I know in the garden primarily through them.  What are you doing in your garden that you would like to share at Acorns On Glen? 

Meet The Espaliers

This is my set of espalier apple trees.  They may be a little hard to see without leaves or fruit on them, but there are two of them.  Each tree has six horizontal branches on them–two at the top, two in the middle and two towards the bottom of the tree.  They are waiting for Spring to take full charge of the weather and then they will bud and sprout leaves.  I also hope to get a few apples from them this year.  The trees were purchased last year towards the middle of Summer at a local nursery that specializes in trees of all kinds.  While the tree nursery is not open to the public, my friend is a landscaper and was able to buy them on my behalf.  Each tree is approximately six feet tall and about five feet wide.  The first year, due to the trauma of their transplant, the trees were full of leaves but did not produce any fruit.  The nursery had told us that this was normal and that fruit should come on strong in the coming year for the trees.  When I bought them, the nursery said they were seven years old.  We are now going into their eighth year.  I wanted to show the bare trees now so that as they grow and prosper (meaning provide me with some apples) that we started at their 2011 beginning. 

A little history on espalier trees.  Espalier is a method of training and pruning a tree or shrub, forcing it to grow flat against a wall or a free-standing trellis.  The word espalier is French, and it comes from the Italian spalliera, meaning “something to rest the shoulder (spalla) against”.  During the 17th Century, the word initially referred only to the actual trellis or frame on which such a plant was trained to grow, but over time it has come to be used to describe both the practice and the plants themselves.  The practice was popularly used in the Middle Ages in Europe to produce fruit inside the walls of a typical castle courtyard without interfering with the open space and to decorate solid walls by planting flattened trees near them.  While they are very pretty in a garden, espalier trees are also an effective technique for producing an ample crop of fruit in a small space.

My espalier trees are two different varieties.  The first is a “Spartan” apple tree.

The Spartan apple is a cultivar developed by Dr. R. C. Palmer and introduced in 1936 from the Federal Agriculture Research Station in Summerland, British Columbia.  The Spartan is notable for being the first new breed of apple produced from a formal scientific breeding program.  The apple was supposed to be a cross between two North American varieties, the McIntosh and the Newtown Pippin, but recently it was discovered through genetic analysis that it didn’t have the Newtown Pippin as one of the parents and its identity remains a mystery.  The Spartan apple is considered a good all-purpose apple.  The apple is of medium size and has a bright red blush, but can have background patches of greens and yellows.

The second type of apple tree that is in the garden is a “Liberty” apple tree.

The Liberty apple is a hybrid cultivar developed by the New York State Agricultural Experiment Station. It was first pollinated in 1955 by crossing a Macoun with a ‘Perdue 54-12’ for the sake of acquiring disease resistances. It was first released to the public in 1974.  The skin is red and smooth with a juicy flesh.

So I hope you enjoyed meeting Mr. and Mrs. Espalier.  I will share their journey throughout this year.  Our goal will be a picture here on Acorns On Glen of an apple pie that contains the fruit from these two trees at the end of the season.  Keep your fingers crossed.  Next for our espalier couple is having my landscaper friend come and build a support system (a trellis or frame of sorts) for them to keep their branches straight and help provide support when the branches become heavier with their leaves and fruit.  There’s a lot more to come with our trees.  Do you have a favorite apple recipe that you would like to share here on Acorns On Glen?

A Miracle Turns Ugly

This is a waterfall that I never knew existed.  In a recent post about Spring, I had mentioned that I had taken a long walk on Glen Road.  Our dog, JoJo, joined me as well.  It was a nice feeling being out on a beautiful Spring-like day and it was the perfect opportunity to get JoJo out for a walk.  She loves the out of doors and this Winter has not given her much of an opportunity to get out and about.  After a few new twists and turns from the path we normally take, I began to hear the sound of splashing and running water.  As I walked towards the sound, the water noises began to get louder and louder.  Rounding the corner, I came across a little miracle….a waterfall.  Maybe water from the swollen creek coming over a dam built by some busy beavers?  I had no idea that this waterfall existed.  Maybe it was just created by the melting winter snow and rain?  I stood there taking these pictures thinking about how something so lovely and peaceful could just pop up out of nowhere.  JoJo stood there in silence as well.  I think she was as surprised as I was that something so beautiful existed so close to home.  This is like a story about life, really.  The fact that you never know what you will see when you round a corner or start a new chapter in your own life.  Nature, in particular for me, gives me miracles almost every day if I look for them.  A sprouting seed, a tomato on a vine, a butterfly, a waterfall.  All signs that wonderful things are out there if you are aware and in the moment.

As JoJo and I ventured closer to the dam itself, it did indeed appear to have many traits that told us this was the work of a beaver.  Beavers are known for their natural trait of building dams on rivers and streams, and building their homes (known as “lodges”) in the resulting pond.  Beavers also build canals to float build materials that are difficult to haul over land.  They use powerful front teeth to cut trees and other plants that they use both for building and for food.  In the absence of existing ponds, beavers must construct dams before building their lodges. First they place vertical poles, then fill between the poles with a crisscross of horizontally placed branches.  They fill in the gaps between the branches with a combination of weeds and mud until the dam impounds sufficient water to surround the lodge.  This dam and the waterfall over it was spectacular.  A couple more shots from the path and then JoJo and I would be ready to walk again knowing that we would absolutely come back soon.  I picked JoJo up and we began to walk.  Then it happened…………

There was a slapping noise on the water and then the sound of feet crunching on dead leaves and grass.  I could not believe what was crawling towards us.  Before our eyes was a brave beaver now standing right by us.  You know I do not like critters, especially ones that drop by without an invitation.  I’m not sure what size a normal beaver really is, but this one was huge (in my mind).  Wet, dripping, redish-brown fur, black beady eyes and five inch razor-sharp claws.  I even think I caught a whiff of hot, steamy, foul-smelling breath coming from its nostrils and mouth.  I was terrified!  How could this be happening to me?  In my mind, I could see the beaver attacking me.  It has teeth that can cut down trees, so I knew that this beaver could easily take me with one bite.  It would knock me out with one slap of its tail on my head.  It would chew me up and store me for future meals.  Future explorers to the dam would look down to find a dirty leg bone (mine) that was used to hold back the water.  The Coroner would confirm on the news a week later that the bone did indeed belong to the man from Glen Road that went missing in the woods.  Thank God I had JoJo in my arms.  The beaver just survived a punishing winter and had to be hungry.  Maybe it was thinking that JoJo looked like an appetizer?  Do beavers have a taste for Yorkies?

I did the most manly thing I could think of while standing there paralyzed with fear.  I let out a high-pitched scream.  This scream was so loud and shrill that it could be heard by animals within a seven mile radius.  No human would ever be able to hear my scream due to the high decibel level that came out of my mouth.  Human ears just aren’t capable of hearing at this pitch.  I turned around, Yorkie in hand, and ran for my life.  I made some zig zags in my course in case the beaver used its strong legs and lunged at me.  It might miss me if I keep going to the left and then to the right.  I quit running about a hundred yards away.  I turned around to see the beast, but it was gone.  Back into the water it loves so well.  That damned dam….why did my miracle have to end so ugly?  What are some of your real-life critter stories that you can share on Acorns On Glen?